
The first time I stood in front of my shower after coming home from the hospital, I just stared at it. I had a new hip, two crutches, a printed sheet of precautions from my surgeon, and absolutely no idea how to get clean without ending up back in the emergency room. Nobody had told me the shower would be the part that scared me most. My surgeon talked about the surgery. My anesthesiologist talked about the anesthesia. Nobody sat me down and said: here is how you bathe now, step by step, without falling.
That conversation happened three days later, when my physical therapist Elena came to the house for our first home visit. She walked into my bathroom, looked at my setup, and said, 'Okay, we have some work to do.' Then she walked me through the whole routine, slowly, while I took notes on the back of an envelope. I have kept those notes. I am going to share what she showed me, because I think every person coming home from hip replacement surgery deserves to hear it before they try to figure it out alone.
Before your first shower after hip surgery, get the bench your PT will tell you to get anyway.
The Carex Shower Bench has padded armrests, a backrest, height-adjustable legs, and a 400-lb weight capacity. It holds steady on wet tile and folds flat for storage. It is what Elena pointed me toward without hesitation.
Amazon Check Today's Price on Amazon →How I've Used This Method
I want to be clear about what this is and what it is not. I am not a physical therapist or a doctor. I am a 71-year-old woman who had a total hip replacement eighteen months ago and learned to shower safely from the person who rehabilitated me. I am sharing what my PT taught me, not giving medical advice. Your surgeon may have slightly different precautions based on your specific procedure, implant, and incision approach. Read your discharge paperwork. Ask your PT. The general framework here is widely used in hip replacement recovery, but the details of your situation belong to your care team.
With that said: the routine Elena taught me worked. I have not fallen once in the shower since my surgery. In the months before I got the right setup and the right technique, I came close twice. Once reaching for a shampoo bottle and once trying to lift my leg too high stepping out. Both times I caught myself on the grab bar. I do not want that for you, and I especially do not want it for your mother or father if you are reading this on their behalf.
Step 1: Set Up Your Bench Before You Even Turn On the Water
Elena was firm about this: do not improvise. Before your first shower home from the hospital, your bathroom needs three things in place. A shower bench rated for your weight. A grab bar mounted securely into wall studs near the entry point. And a non-slip mat both inside the shower and on the floor immediately outside. If any of those three are missing, that day is not the day to shower. Sponge bath only.
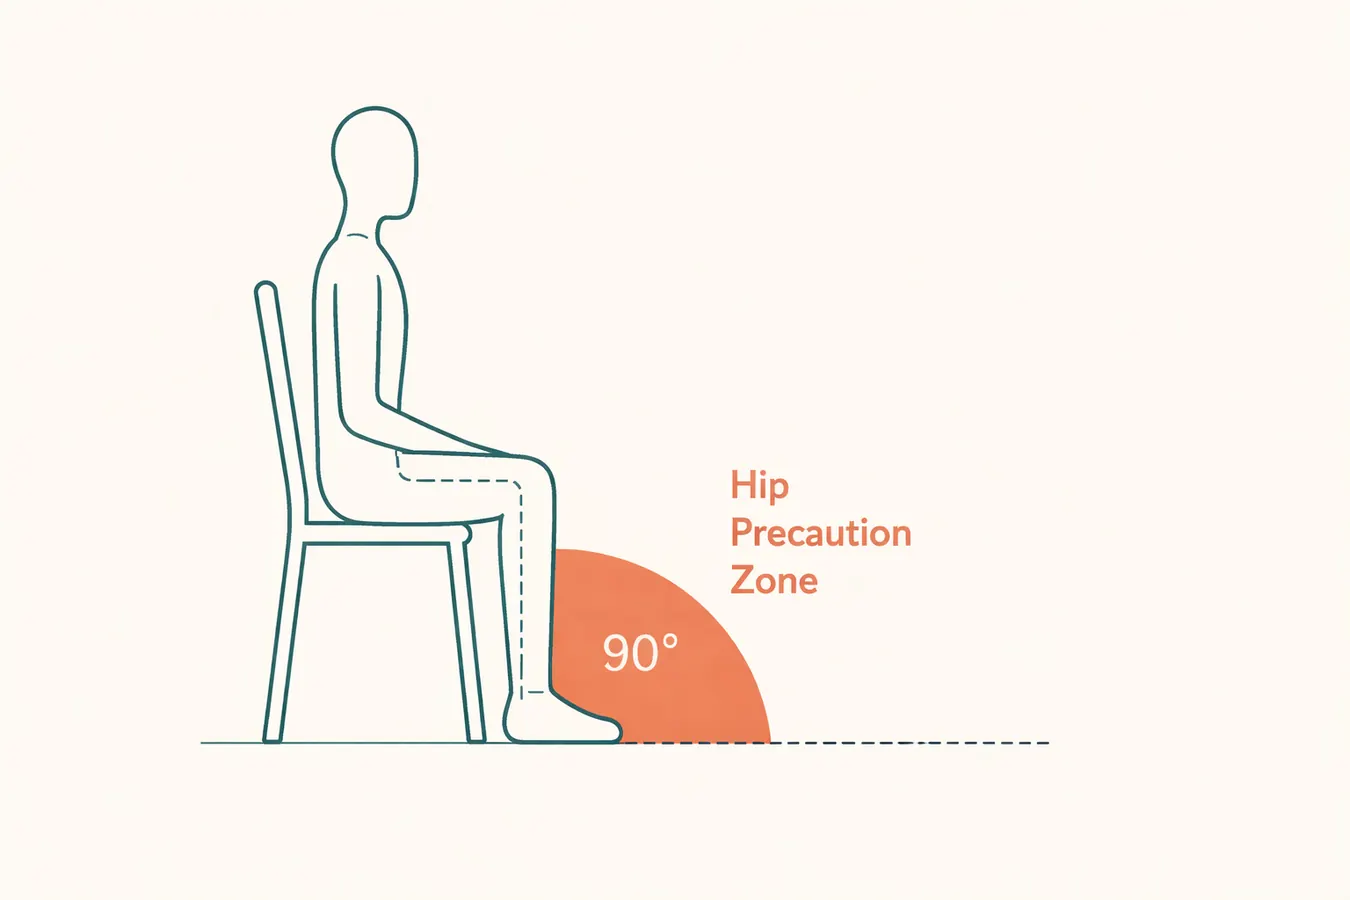
The Carex Shower Bench was what she pointed me toward because of the padded armrests. I need to push off those armrests to stand up, and soft armrests matter when your hands are wet. She had me set the bench legs to a height where my knees were at roughly 90 degrees when seated, or slightly below hip level. That positioning matters for the hip precaution rule, which I will explain in the next step.
Position the bench so the seat is under the showerhead spray or just in front of it, not off to the side where you would have to twist to reach the water. Twisting the torso while seated is an easy way to rotate the hip more than you intend. Get your towel, shampoo, body wash, and anything else you need within arm's reach before you get in. Reaching and bending are where most recovery-phase falls happen, and they happen because something was forgotten.

Step 2: Enter the Shower Using the Grab Bar, Surgical Leg First
For anterior or posterior hip replacement, your surgeon will have given you a list of hip precautions. The most common one is the 90-degree rule: do not bend the hip past 90 degrees. That means no deep squatting, no bending to pick things up off the floor, and no stepping over a high threshold in a way that forces your hip joint toward a tight angle. This is the rule that makes the shower entry the most critical moment in the whole routine.
Elena had me face the grab bar and enter with my surgical leg first. One hand on the grab bar, one hand on the bench armrest if it is reachable, and I step the operated leg over the threshold first, keeping the knee from lifting too high. Then the other leg follows. I keep my back straight throughout. I do not look down at my feet because that rounds the spine and can shift weight in unpredictable ways. I look at the wall in front of me and I move slowly.
If you have a standard tub rather than a walk-in shower, the threshold is much higher and the risk is significantly greater. Elena told me that tubs are one of the top environments where hip replacements are compromised in recovery. If you are showering in a tub, please talk to your occupational therapist about a tub transfer bench, which is a different product than a standard shower bench and is designed specifically for getting over a tub wall safely. For a walk-in shower, the Carex bench is the right tool.
Step 3: Sit Down Before You Adjust the Water Temperature
This sounds like a small thing. It is not. Standing in a shower stall adjusting a temperature knob means you are balancing on one leg, potentially on wet tile, with your attention on the knob and not on your footing. Elena watched me try to do exactly this on my first practice run and stopped me immediately. Sit on the bench first. Then adjust the water.
Pre-adjust the temperature before you get in if you can reach the knob from outside the shower. Turn it to where you know it needs to be, step in, and only fine-tune it once you are seated. Hot water also affects blood pressure and can cause lightheadedness, especially in the weeks right after surgery when your body is still managing post-operative fatigue. A shower that is comfortable rather than very hot is safer. This is another thing nobody told me before Elena said it.
Once seated on the Carex bench, I let the water run over me for a moment before doing anything else. If I feel dizzy or off, I have the armrests to grip and the session ends early. Showering is not worth a fall. This is the thing my daughter needed to hear most when she set up this routine for me: there is no shame in getting out early or calling for help. The shame is in trying to push through and ending up on the floor.
Elena told me: 'Ginny, a shower is not a test of your recovery. It is a task with specific risks. We manage the risks. We do not ignore them.'

Step 4: Wash in Sections, Never Reach Past Your Knees
The 90-degree hip precaution does not disappear once you are seated. It means that even while sitting on the bench, you should not lean forward far enough to bring your chest toward your thighs. For washing your feet and lower legs, you need either a long-handled bath sponge or a foot scrubber that suctions to the shower floor. Do not bend down. Do not reach past your knees. This is the part of the routine most people skip because it feels overly cautious, and it is also the part where people get hurt.
I wash my hair, face, neck, upper chest, and arms first. Then torso. Then I use a long-handled sponge for my lower legs and feet. I keep a foot scrubber mat on the shower floor so I can work my feet against it without bending. The sequence keeps me from having to shift positions repeatedly or reach in unpredictable directions. Keep your feet flat on the floor of the shower or on a non-slip mat if you are using one inside.
Rinse from seated. I turn my body slightly side to side, using the armrests of the Carex bench for support, to get good rinse coverage without standing. There is no rush. If the water pressure is strong enough, let it do the work. If you need to angle the showerhead, do that before sitting down, not after.
Step 5: Stand Up and Exit the Same Way You Came In
Getting out is statistically riskier than getting in. You are wet, possibly a little tired, and the floor of the shower is at its slipperiest. Elena had me practice the stand-up movement three times before she was satisfied with it. Here is the sequence she drilled with me: slide forward on the bench so your feet are flat on the floor and your knees are directly over your ankles. Grip both armrests. Push straight up, leading with your chest, not your head. Do not tilt forward to get momentum. Come to a full standing position and pause before reaching for the grab bar.
The pause matters. Your blood pressure shifts when you stand, and for seniors, especially post-surgical seniors, that shift can cause a second or two of lightheadedness. The pause lets your body equilibrate before you take a step. Elena called it 'the standing still moment.' It is five seconds. It has probably prevented more shower falls than any piece of equipment.
Exit with your non-surgical leg first, onto the bath mat outside the shower. Keep one hand on the grab bar until both feet are on the mat and you are stable. Do not rush to get your towel. Dry off in place, with the grab bar still within reach, before walking anywhere. Wet feet on a dry floor are almost as slippery as wet feet on a wet floor, and the transition moment between shower and bathroom is where people fall late in the routine when their guard is down.
What Else Helps
The bench and the technique are the foundation, but there are a few other things that made a real difference for me. A handheld showerhead on a slide bar lets you direct the water exactly where you need it while seated, without twisting. A grab bar on both sides of the shower entry is better than one, though one is far better than none. A terry-cloth robe waiting on a hook at arm's reach means I am not dripping across the bathroom floor to get to a towel. And I leave the bathroom door unlocked every single time, without exception, so that if I needed help someone could get in. That rule was my daughter's idea and it is a good one.
If you are buying for a parent who is coming home from hip replacement surgery, the Carex Shower Bench is the single most useful thing you can give them. It does not feel like a gift, I know. It feels clinical. But it is the difference between a parent who showers safely with some dignity and a parent who either refuses to shower out of fear or tries to improvise and falls. I speak from experience on all three of those states. The bench is worth it. Read more about why shower equipment matters in my article on why every senior needs a shower bench before they fall, and if you are deciding between products, see my full Carex shower bench review after a year of daily use.
What I'd Tell You If We Were Sitting at My Kitchen Table
I would tell you that the fear of showering after hip surgery is real and it is not silly. The bathroom is where a lot of hip replacements fail during recovery, not on a walk outside or getting in and out of a car, but in a six-foot shower stall where you thought you were safe. I would tell you not to rush it, not to skip the bench because you think you can manage without it, and not to try any of this alone the first few times if you have someone at home who can be nearby.
And I would tell you to write down what your PT shows you. Elena taught me this method in about thirty minutes on a Tuesday morning. I wrote it on an envelope. That envelope is still in my medicine cabinet drawer. The routine is automatic for me now, but those notes remind me that there was a time when it was not, and that learning it was worth every careful minute.
Your PT will show you the technique. The bench is what makes the technique possible.
The Carex Shower Bench holds up to 400 lbs, has padded arms for pushing off from wet hands, adjusts to your height, and folds flat. It is what I use every morning. Check the current price on Amazon and see whether it ships in time for your loved one's discharge date.
Amazon Check Today's Price on Amazon →